Pottery Wheel Posture and Hand Strain: How to Throw Comfortably and Safely
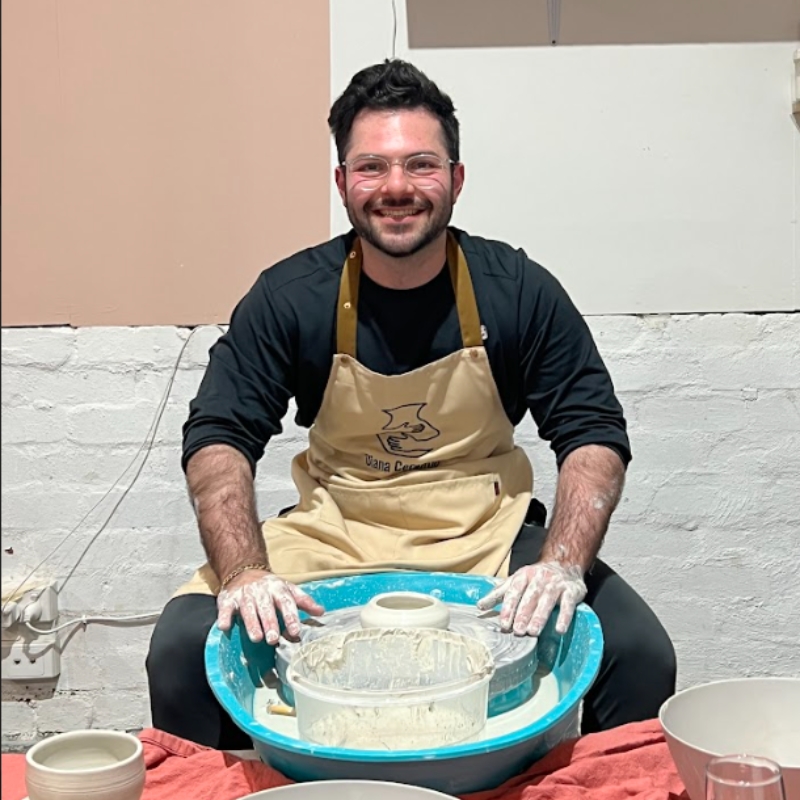
Throwing on the wheel is meant to feel steady and rhythmic. But if your shoulders creep up, your wrists fold into awkward angles, or you’re gripping as if your life depends on it, wheel work can quickly turn into sore hands, tight forearms, and a stiff lower back.
This guide is for beginners (and returning potters) who want to throw with more comfort and control. You’ll learn how to set up your station so it fits your body, how to brace so your hands don’t do all the heavy lifting, and how to spot early warning signs before they become stubborn pain.
Why posture matters so much at the wheel
Wheel work is repetitive by nature. Even a short session can involve hundreds of near-identical movements: stabilising, compressing, opening, pulling, refining. When your joints are stacked well, your body shares the load. When they’re not, smaller structures (wrists, thumbs, finger joints, forearm tendons, neck) get overworked.
A helpful way to think about wheel ergonomics:
• Your legs and core create stability
• Your spine stays long (not rigid)
• Your shoulders stay relaxed
• Your elbows and forearms become supports
• Your hands do guidance, not wrestling
If your hands are doing the wrestling, strain is almost guaranteed.
Quick setup check before you touch clay
Sit (or stand) at the wheel and ask:
• Can I breathe low into my ribs and belly without feeling compressed?
• Are my shoulders down and my neck long?
• Are my wrists mostly straight rather than sharply bent up/down?
• Do my elbows feel supported by my thighs or torso?
• Can I reach the clay without rounding my lower back?
If any answer is “no”, fix the setup first. A better setup makes the technique easier and more consistent.
Q&A: Is it normal for beginners to feel sore?
Mild, short-lived fatigue can be normal when you’re learning new movements, especially if you’ve had a big day at the wheel. Sharp pain, burning forearm pain that escalates fast, tingling/numbness, or pain that sticks around for days isn’t something to “push through”. It’s a signal to adjust posture, reduce intensity, and take proper breaks.
Set up your wheel station for your body
You don’t need a perfect ergonomic studio fit-out. Small adjustments make a big difference, especially in shared studios where stool height and wheel position aren’t tailored to you.
Seat height
Your seat height should help you feel grounded and stable, without perching or collapsing.
Aim for:
• Feet flat on the floor (or on a stable support)
• Knees roughly level with hips, or slightly lower than hips if you tend to round your back
• Enough space for thighs to act as elbow supports
If your knees are too high, you’ll often tuck your pelvis under and slump. If the seat is too high and you can’t ground through your feet, your hips and core can’t help, so your hands grip harder to compensate.
Studio-friendly fixes:
• Add a firm cushion if the stool is too low
• Use a stable foot block if your feet don’t sit comfortably flat
• If you’re short, even a thick folded towel under your feet can reduce pelvic rocking
Distance from the wheel head
Too far away and you’ll reach with your shoulders and round your spine. Too close and you’ll jam your wrists into extreme angles.
A good starting point:
• Your elbows can rest lightly on your thighs while your hands reach the clay
• Your torso stays tall without leaning or collapsing
• You can keep wrists close to neutral (straight-ish) during centring
If you notice your shoulders creeping forward, move closer first. Don’t “solve” reach by rounding your back.
Foot pedal placement
Foot pedal position affects your whole chain, from hips to neck. If the pedal is too far away or off to the side, you’ll reach with your leg, rotate through your pelvis, and twist your spine.
Try:
• Pedal close enough that your knee stays under your hip
• Smooth pressure without your pelvis shifting side to side
• If you swap feet, reset your hips and shoulders so you don’t twist in one direction all session
Standing vs sitting
Standing can help some people avoid low-back stiffness, but it can also encourage shoulder tension if the wheel height is wrong.
Standing tends to work better when:
• The wheel head is high enough that you’re not bending forward from the waist
• You can keep elbows close to your body (or use a support)
• Knees stay soft (avoid locking out your legs)
Sitting tends to work better when:
• You can ground through your feet
• Thighs can support elbows
• You can stay tall without slumping
If you’re unsure, alternate: sit for throwing, stand briefly between pieces, then reassess how your back and wrists feel.
The biggest cause of hand strain: the “death grip”
Most beginners squeeze too hard because the clay feels unpredictable. The wheel is spinning, the water is slippery, and the piece wants to wobble. The instinct is to clamp down.
The problem: gripping harder usually doesn’t stabilise the clay. It often increases wobble, adds friction, and forces wrists into bent angles. The better solution is bracing and body weight.
Use bracing so your hands can relax
Bracing means your arms are supported, so your hands don’t have to hold everything steady on their own. Your hands become guides rather than power tools.
Try this baseline position:
• Sit tall
• Rest elbows lightly on thighs (or keep them close to your torso)
• Shoulders down
• Forearms form a stable “frame”
• Move from the hips and torso when you need more pressure, not from the wrists and fingers
When elbows float, hands work overtime. When elbows are supported, hands can soften and become more precise.
Keep wrists closer to neutral
A “long” wrist (not sharply bent) is generally a happier wrist. Extreme wrist flexion/extension under load is a common trigger for irritation.
Helpful cues:
• “Knuckles forward, wrist long”
• “Pressure from the heel of the hand, not fingertips” (when it makes sense for the move)
If you feel your wrist folding sharply, pause and change your position. Often, the fix is moving your body closer, raising your seat slightly, or bracing your elbow more firmly.
Q&A: Why do my hands shake after centring?
Hand shaking is usually fatigue from gripping too hard, holding breath, or fighting the clay with small muscles. Reset with a short break, loosen grip, re-brace elbows, and slow down. If it happens early in a session, it’s a sign your setup is forcing your hands to do too much work.
Centring with less strain (and more control)
Centring is where many people feel the most forearm burn. Beginners often fight the wheel with their hands, which is exhausting and can irritate wrists.
Comfort-first centring principles:
• Get close enough that you can lean in from the hips (not curl from the spine)
• Lock elbows into your body or onto your thighs
• Use core stability to keep your torso steady
• Apply pressure gradually rather than suddenly
• Keep breathing (breath-holding often equals gripping)
A practical trick: if you notice your shoulders rising, you’re probably asking your hands to do a job your posture should be doing. Drop shoulders, brace elbows, and restart with lighter pressure.
Q&A: What wheel speed is easiest on the body?
For beginners, moderate speed often wins: fast enough that the clay responds, slow enough that you don’t panic-grip. Too fast can trigger bracing and tension; too slow can tempt you to muscle the clay. If your wrists ache, slightly slowing down and focusing on steady, supported pressure can help.
If you’d like real-time feedback on bracing, wrist position, and relaxed centring, a beginner wheel-throwing workshop in Melbourne can help you lock in comfortable habits from day one.
Pulling walls without wrecking your wrists
Pulling is another moment when wrists can take unnecessary load, especially as the wall gets taller and thinner. Many beginners pull with bent wrists and tense shoulders, then wonder why their forearms feel cooked.
Keep shoulders soft and low
Shoulders rising towards the ears is one of the most common strain patterns. That tension travels into forearms and hands.
Try:
• “Shoulder blades heavy”
• “Neck long”
• Exhale as you pull (it reduces bracing and grip)
Let the wheel and clay condition help you
When the clay is well-centred and the speed is appropriate, you don’t need to force it. Excessive pressure increases friction and fatigue.
If you’re struggling:
• Slow the wheel slightly
• Add a touch of water (not a flood)
• Compress and refine the base before pulling higher
• Do more gentle pulls rather than one hard pull
A surprising comfort win is simply doing fewer “hero pulls” and more consistent, moderate pulls.
Brace and move as a unit
Instead of pulling with fingers alone:
• Brace elbows
• Keep wrists long
• Let torso rise subtly with the pull
• Maintain steady contact rather than pinching
When the whole upper body moves together, the wrists stop being the hinge point.
Q&A: My thumb joint aches after throwing. Why?
Thumb pain often comes from pinching (especially during opening and pulling) and from clamping during centring. Try widening contact points (using the side of the hand or the heel of the hand when appropriate), reducing pinch force, and giving your thumbs a rest between pieces. If pain persists or you feel clicking/locking, reduce load and consider professional advice.
Trimming posture: the sneaky strain culprit
Throwing gets the attention, but trimming often causes worse neck and wrist pain because people hunch for long periods doing precise work.
For safer trimming:
• Bring the work higher if possible (a riser, a bat, or a stable platform)
• Sit close enough that you’re not reaching
• Keep your neck long; move your torso closer rather than craning forward
• Relax your grip on the trimming tool (control comes from stability, not force)
If you notice tingling or numbness while trimming, stop and reset. Persistent tingling deserves a proper check-in with a qualified health professional.
A simple warm-up that actually helps
You don’t need a long routine. Two to four minutes can reduce “cold start” strain, especially on chilly Melbourne mornings when hands feel stiff.
Try:
• Shoulder rolls and gentle neck turns
• Open/close hands 20–30 times
• Wrist circles both directions
• Light forearm massage
• A few slow squats or hip hinges to wake up legs and core
The goal is blood flow and mobility, not intense stretching.
Q&A: Should I stretch my wrists hard before throwing?
Gentle mobility and a warm-up usually beat aggressive stretching. Stretching hard into discomfort can irritate tissues further. Keep it easy, warm up first, and rely on bracing and posture to reduce load.
Micro-breaks: the underrated secret to longer sessions
Most hand strain builds quietly. You might feel fine on pieces one and two, then suddenly your wrists feel “hot”, or your hands start cramping by piece four.
Use micro-breaks:
• Every 10–15 minutes: drop shoulders, shake hands, breathe, reset posture
• Every 30–45 minutes: stand up, walk, open chest, roll wrists gently
• Switch tasks: throwing → wedging → trimming → cleaning to change the movement pattern
General Australian guidance on managing ergonomic risks also emphasises adjusting work to reduce strain and varying tasks where possible, even outside pottery: Comcare’s ergonomic hazards guidance
For many beginners, a hands-on pottery wheel throwing experience is the fastest way to feel how little grip you actually need once your elbows are supported and your posture is doing the stabilising.
Common pain patterns and what to do about them
This is practical guidance, not a diagnosis. If pain persists, worsens, or includes tingling/numbness, get advice from a qualified professional.
Wrist pain (front or back of wrist)
Common causes:
• Wrists bent under load
• Over-gripping during centring
• Pulling with finger strength instead of supported pressure
Try:
• Move closer so wrists can stay longer/straighter
• Brace elbows on thighs
• Reduce pressure and do more gradual pulls
• Check wheel speed (slightly slower often helps)
Hand cramps
Common causes:
• Holding tension without breaks
• Using fingertip strength for stability
• Starting cold and ramping up too fast
Try:
• Warm up your hands before you start
• Use micro-breaks between pieces
• Lighten grip and focus on elbow support
• Hydrate and avoid “marathon” throwing when you’re learning
Forearm tightness or burning
Common causes:
• Sustained gripping
• Floating elbows
• Too many pieces back-to-back
Try:
• Stronger elbow bracing
• Shorter sets with resets
• Gentle forearm massage and mobility
• Stop before you hit “burning” fatigue
Neck and shoulder tension
Common causes:
• Shoulders creeping up during effort
• Leaning forward to see details
• Hunching during trimming
Try:
• Bring the work closer rather than bringing your head closer
• Exhale during effort
• Use the cue “heavy shoulders” every few minutes
• Stand briefly between pieces
Technique cues that reduce strain and improve results
If you only keep a few cues, make them these:
• Sit/stand tall and breathe
• Brace elbows (thighs or torso)
• Keep wrists long (avoid sharp bends)
• Use steady pressure, not sudden force
• Let wheel speed and clay condition do their jobs
• Take micro-breaks before fatigue spikes
If you’re at the stage where you just want to learn the basics of wheel throwing without building sore-wrist habits, prioritise setup, breathing, and steady pressure over speed.
When to stop (and not push through)
Pottery culture can be “just one more piece”, but pushing through the wrong symptoms can turn a small issue into weeks of irritation.
Pause and reassess if you notice:
• Tingling, numbness, or pins-and-needles
• Pain that ramps up as you throw (instead of easing as you warm up)
• Night pain or waking with numb hands
• Weakness or dropping tools
• Swelling that doesn’t settle after rest
It’s not about being fragile. It’s about protecting your ability to keep making.
Melbourne studio realities (and easy fixes)
In many Melbourne studios, stools and wheels are shared, heights vary, and you won’t always get the perfect setup. Bring tiny solutions and build a quick reset habit.
Consider:
• A firm cushion you can carry easily
• A small towel (height tweak, elbow padding, quick wipe-down)
• Warm layers in winter so hands aren’t starting cold
• A habit of resetting your station before each piece (seat height, distance, pedal)
Tiny adjustments, repeated often, do more than one big overhaul you never maintain.
FAQs
What’s the safest posture for throwing on a pottery wheel?
A tall, relaxed posture is best: neutral spine, shoulders down, elbows supported (often on thighs), and wrists kept close to neutral. Your body should feel stable enough that your hands can stay calm.
How high should my seat be for wheel work?
High enough that you can ground through your feet and keep your spine long, but low enough that your thighs can support your elbows. If you’re slumping, raise the seat slightly. If you feel perched and unstable, lower it or use a foot support.
Why do my wrists hurt when I throw?
It’s commonly a mix of bent wrists under load and over-gripping. Move closer, brace elbows, lighten pressure, and aim for “long wrists”. If symptoms persist or include tingling, seek professional advice.
Is standing better than sitting at the wheel?
It depends. Standing can help if sitting causes low-back stiffness, but only if the wheel height allows you to stay upright without hunching. Many people alternate sitting and standing across a session.
How often should I take breaks?
Use micro-breaks every 10–15 minutes (drop shoulders, shake hands, reset), and take a longer posture break every 30–45 minutes. Short sessions with good form beat marathon sessions with strain.
What’s the fastest way to reduce hand cramps?
Reduce grip, brace elbows, warm up hands before starting, and take short resets between pieces. Cramping often improves quickly when your hands stop doing all the stabilising work.